Monetize Wix Blog with Google Ads: Do It Right!
After a few months my client’s blog reaches 1000 page views a month. He wants to see some money rain down on his bank account. So he decided to set up some Google ads on his blog.
So if you are on the same boat, you can use the following process to add Google AdSense to your Wix blog.
- Get a Google Adsense account
- Connect your Wix site to Adsense
- Wait for approval from Google
- Add Adsense code to your post
Google Adsense is one of the easiest monetized methods on the internet. But you do need to know the proper way to set it up. Otherwise, it is going to be a bumpy road.
1. Get a Google Adsense account
Before you can advertise with Google Adsense on your Wix blog, you must have a Google Adsense account.
Inside your account you set up a payment method, get the codes to display ads, and monitor the ads performance on your website.
The registration is easy. But you won’t be able to use your account right away. It will take about two weeks for Google to approve your account. There is a risk that your account gets rejected.
To increase your chance of getting the approval, your blog must satisfy two requirements below. I don’t know Google internal criteria to approve an ads account. But none of my client websites got rejected because they satisfied those requirements.
1.1. Have your own domain
Immediately after the ads account registration, Google asks you to enter your website domain. If you use the free Wix account, and are given a free subdomain like www.wix.com/yoursite, you will not get the approval.
I think Google considers the free domains unprofessional and scammy. If you don’t own a domain for your blog right now, you should get one. It costs about fifteen dollars a year. But if you get a paid subscription with Wix, you can own a domain for free for one year.
You will need a paid subscription to connect your Wix site with a domain anyways. So, Click here to get your subscription. It is an affiliate link. But you won’t pay any extra. Thank you for your support.
1.2. Publish 10 posts before getting an ads account
You should wait until you have about 10 blog posts before you open a Google Adsense account. The reason is that you want to prove to Google that your blog is helpful and provides people with values. It is not a scammy site.
Each blog post doesn’t have to be long. The appropriate length is about 500 plus words.
2. Add Google Adsense to your blog post using the HTML codes
You have been working on your site to satisfy the requirements above. You are now confident that you can get approval from Google Adsense. So you go ahead and open an account.
2.1. Connect your Wix site to Adsense
Your next task is to connect your Wix site with your Adsense account.
Google Adsense therefore asks you to insert the Adsense code in between the <head> <head/> tags.
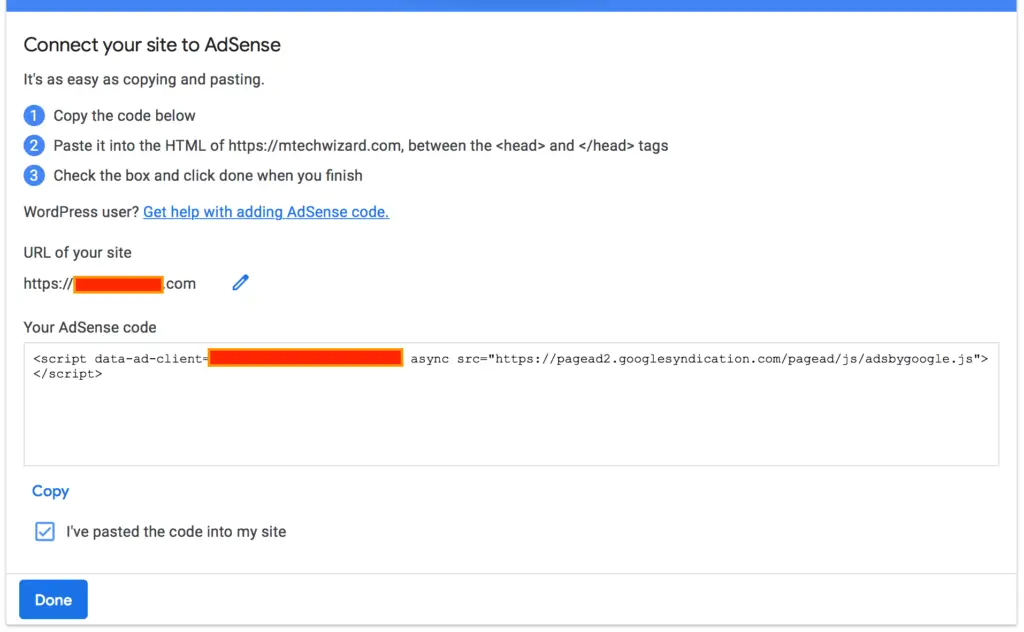
In order to make web development easy, Wix hides those tags from you. But you still can update or insert codes between those tags if you follow the instructions below:
- Click Settings on Wix Dashboard
- Click SEO
- Click the link under Add Header Code Meta Tags
- Copy and paste Adsense code to the header tag area
2.2. Wait for approval from Google
After you insert the Adsense code to your Wix header tags, you can proudly check the “I’ve pasted the code into my site”. And hit the Done button.
Now you can take a break for a few dates. Because Google needs some time to approve your website for ads. Thus, regularly check your Google Adsense account once every few dates for the good news.
2.3. Add Adsense code to your post
You have been waiting for a couple dates. Suddenly, you see the approval in your account. If it is the case, congratulations!
Your last task is to insert the ads to your blog posts. The process is a little strange for you since you are not familiar with coding. But it isn’t difficult. Basically you copy the ads code snippet and paste it to the advertising places on your posts.
Follow the steps below to generate code snippet in Google Adsense
- Go to the Ads
- Click Ad Units tab
- Click New ad unit
- Select Display ads
- Choose either Fixed or Responsive for Ad size
- Complete the process
- Click Create
- Click Copy code snippet
After that, you jump to your Wix blog post, and paste the code snippet. Follow the steps below:
- Click Edit button on the post
- Click the HTML icon </> at the page bottom
- Click the Add HTML or URL icon
- Select HTML Code
- Paste the above code snippet
- Click Update button
3. How many AdSense ads per post
You have learned how to set up Google AdSense on your blog. Now you want to add thousands of ads so that money rains down on your bank account. But wait!
The moment you insert ads to your blog posts, your blog readers start feeling annoyed. The ads constantly interrupt their reading. The more ads you have, the more negative your readers feel.
You don’t want to have low customer satisfaction. It will negatively affect your ranking on Google, and then your future traffic. There must be a good balance between your content and ads.
So how many ads per page? It depends on the display devices and the lengths of your posts.
3.1. Desktop Vs Mobile
Desktop screens are bigger than mobile device screens. Therefore, you have more space for ads on desktops than you do on mobile devices.
On the desktop version of your website, you can have ads at the top, the bottom, or the side areas of your screen. However, you cannot have side area ads on your mobile website. The mobile screens are too small for that.
You can use pretty much any ads size on your desktop website. But you can only use much smaller ads sizes on your mobile website. Actually, the 300 x 250 ads size performs very well on the mobile devices.
3.2. Post length
The longer your post is, the more ads you can throw into it.
In the past, Google AdSense limited the number of ads to three per page. That restriction is lifted now. You can have as many ads as you like on a page. But you don’t want to overdo it and create negative experiences.
My personal ads formula is three ads per 1000 words. It works well for me and my clients. You should try it out.
Also, you should avoid placing ads right below your blog post title. An ad in that position is a big ask for your visitors when they haven’t yet found any value on your post.
4. Turn off AdBlockers before you test your website
A lot of my clients published their websites and found out that their Google AdSense ads didn’t work.
It is not because they made any mistake in the process. They simply forget to turn off Ad-Blockers. Just so you know what to check first when your Google AdSense ads don’t work.
Conclusion
Setting up Google AdSense on your Wix site isn’t hard. But there are a few obstacles. The biggest one is to get the approval from Google to display ads on your site.
If you have your own domain, and your site has some good content, you will get the approval.
Check out my other posts for more helpful content.