How to Create Multi Page Form on Wix
You use forms to collect visitors’ information. Many times your forms are big and ask for a lot of information. Fitting those forms in one web page is impossible. They just make your web page very messy.
Therefore, you decide to break a big form into multiple smaller forms. Each form is on a different web page. You try to create a multi-page form!
The challenge is that Wix creates a new row in your collection whenever the user jumps from one page to another. You don’t want that. You want only one row per user. And that row has all the data on the multi-page form.
Wix doesn’t have a drag-and-drop solution for this yet. But I will show you the how in 6 steps below.
- Step 1: Design your collection
- Step 2: Create your multi page form
- Step 3: Insert formId to each page
- Step 4: Generate a FormId per User
- Step 5: Combine Collection Rows on Wix Server
- Step 6: Call Wix Server to Do The Work
Step 1: Design Your Collection
The first step is to create a collection that holds your multi-page form input data. Each field on the collection is a piece of information on your form.
After you are done, I want you to add an extra field and name it “formId”. The field type is “Text”. We will use this field to combine all the rows of the same form into one.
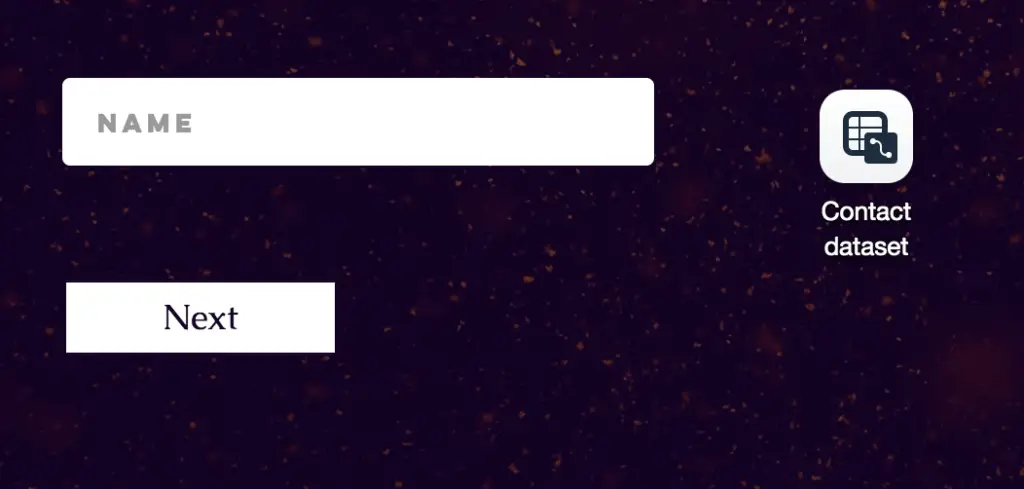
Let’s say I want to create a “Contact” multi page form. The first page of the form has the name input. The second page of the form has the email input. Then my collection has three columns: name, email, and formId (screenshot below).

Step 2: Create Your Multi Page Form
The next step is to create multiple web pages, add data input elements on each page, insert datasets, and link those elements with your collection through the datasets. Those steps are very standard.
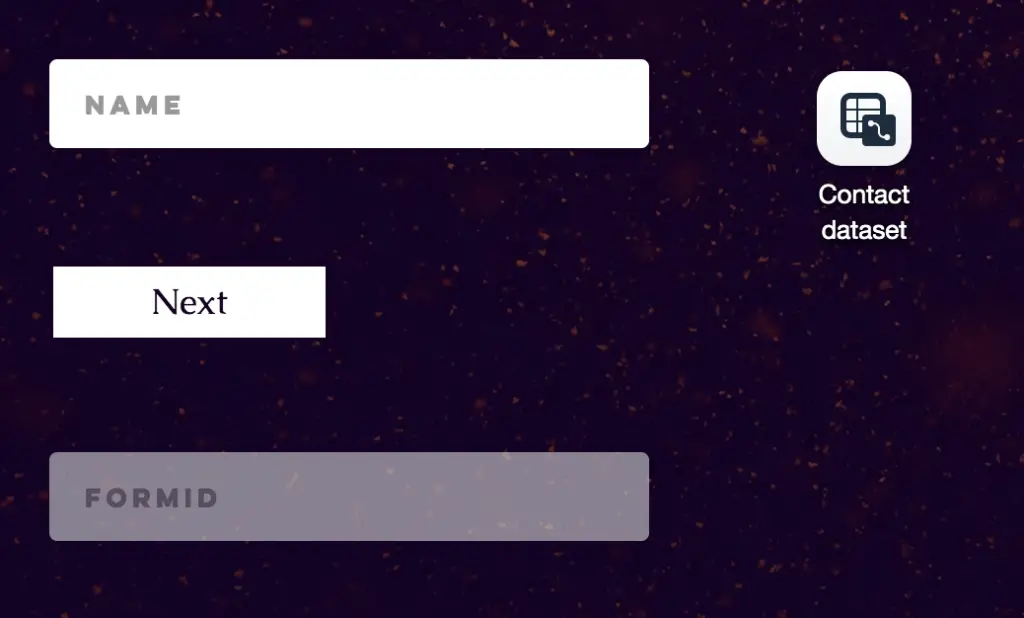
For my above example, I create three web pages: Name, Email, and Thank you. “Thank you” page basically displays thank you message to the users after they complete the form.

The “Name” web page has “name” text input, “Next” button, and “Contact” dataset.
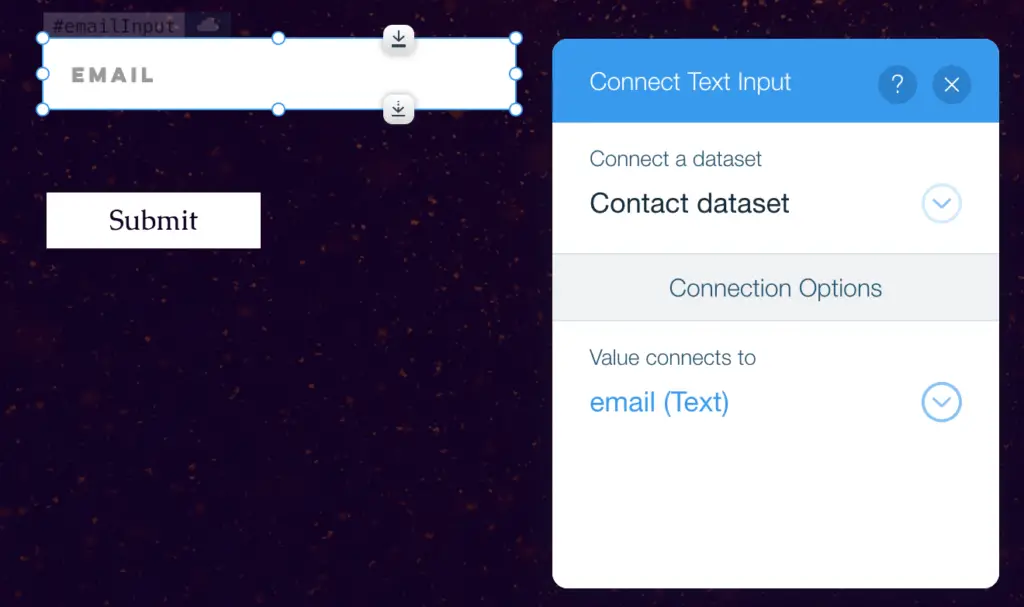
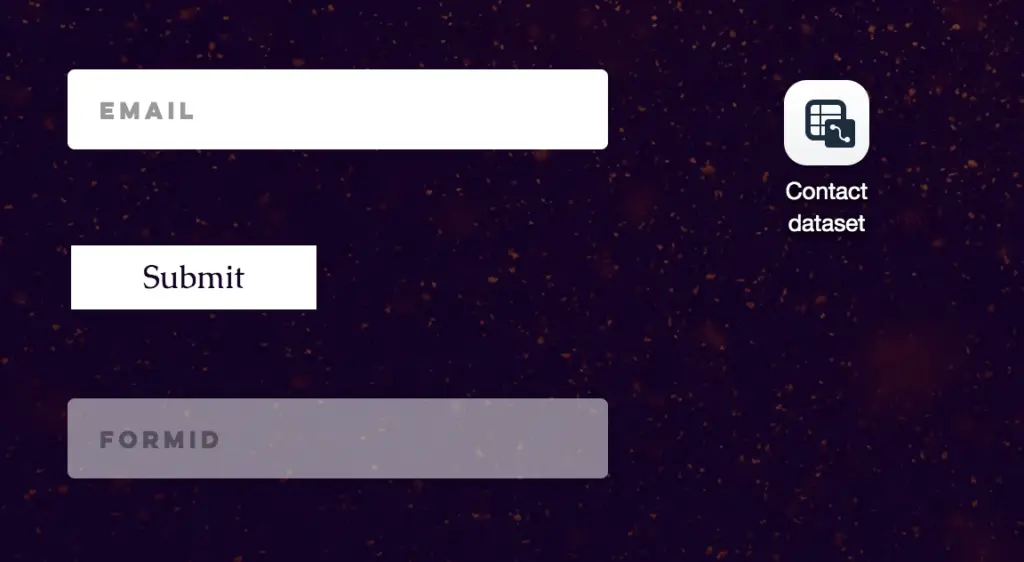
My second page has “email” text input, “Submit” button, and “Contact” dataset.

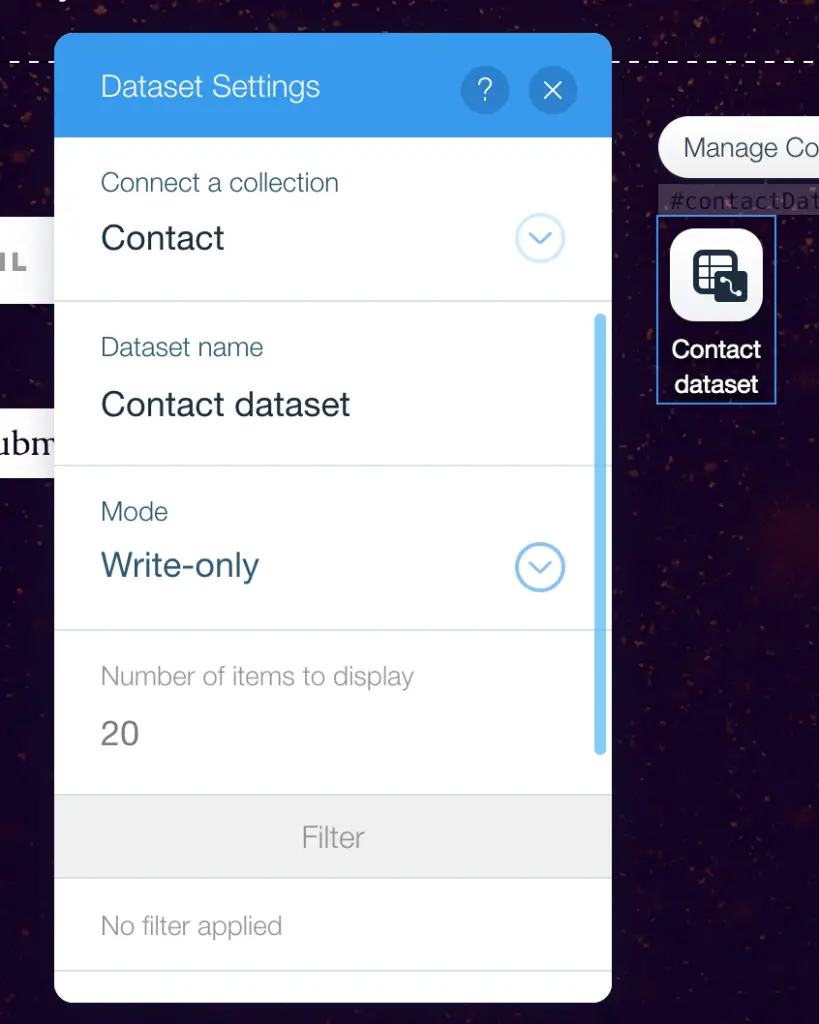
My “Contact” dataset links to my “Contact” collection and has “write-only” mode.
My text inputs (name and email) connect to my “Contact” dataset. And their values connect to “name” and “email” fields in my collection.
The settings for “Next” button are as follow:
- Connect to “Contact” dataset
- Click action connects to Submit
- When successful, navigate to A link…
- Link to my Email page

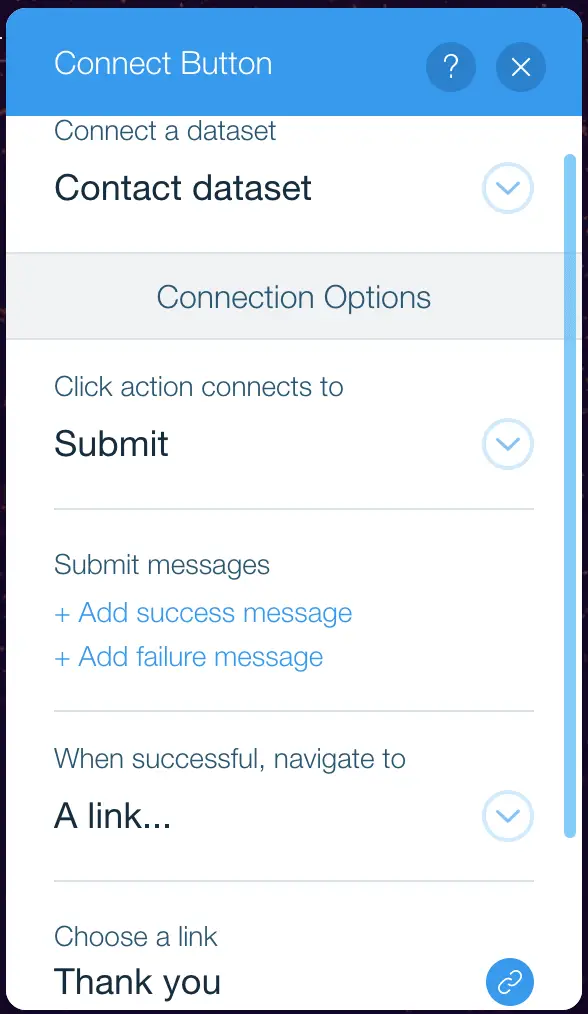
The settings for “Submit” button are as follow:
- Connect to “Contact” dataset
- Click action connects to Submit
- When successful, navigate to A link…
- Link to my Thank-you page
With the above setup, your form will work as follow. First you direct the users to the first page of the form. The users enter information, hit the next button, and jump to the next page of the form. They continue until they reach the thank-you page.
Wix still creates a new row every time the users jump to a new page. But you will have some codes on your site to clean up those extra rows, so that you always have one row per multi-page form. Follow my instruction below.
Step 3: Insert FormId to Each Page
The codes rely on an assumption that each row in your collection has a formId. And all rows from the same multi-page form have the same formId value.
Therefore, we need to add a “formId” input on each page of your form. Take a look at my example pages below.

The formId inputs are not like other inputs in your form. They are hidden on load. No one can see it. They have the same “formIdInput” ID. See the “View Properties” of the formId below.
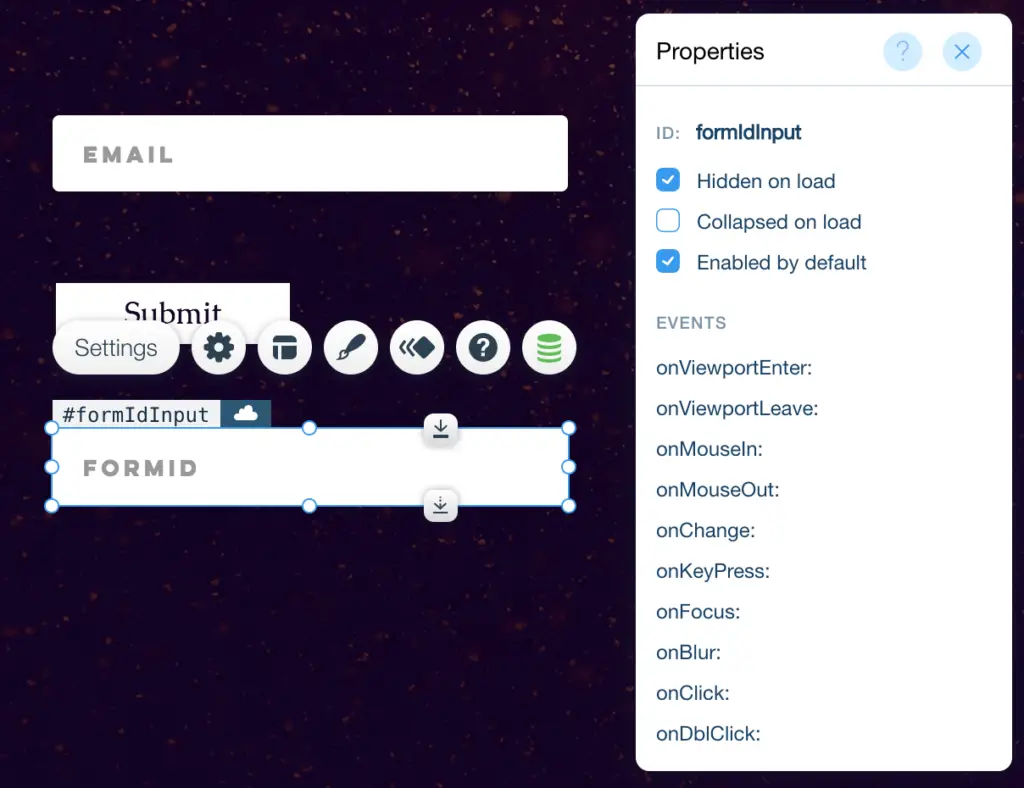
And they connect to formId of your dataset.

Step 4: Generate a FormId per User
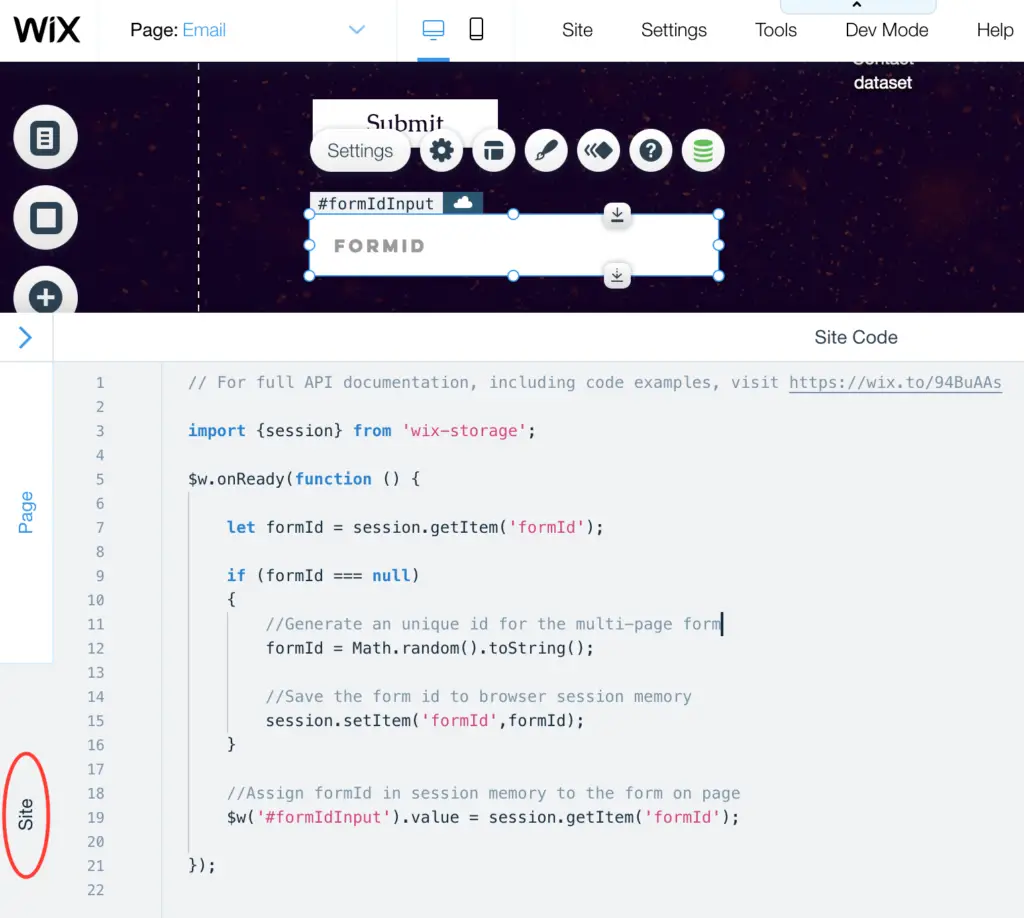
If you are not interested in coding, simply copy and paste the below codes to your “Site”. In case you are interested, the codes generate a random value, and use that value as your formId. The codes have a check so that only one formId is generated per browser window.
import {session} from 'wix-storage';

$w.onReady(function () {

    let formId = session.getItem('formId');

    if (formId === null)
    {
        //Generate an unique id for the multi-page form
        formId = Math.random().toString();

        //Save the form id to browser session memory
        session.setItem('formId',formId);
    }

    //Assign formId in session memory to the form on page
    $w('#formIdInput').value = session.getItem('formId');

});
Now test your pages. Fill out those inputs. Hit next buttons. Check out your collection afterward. And check out mine.

Even though my collection has multiple rows, each row has the same formId. If your rows get the same formId value, you complete this step wonderfully.
The next step is to combine those rows into one row. Let continue the magic.
Step 5: Combine Collection Rows on Wix Server
Because you are going to changes the collection using the codes below. And because the collection is on Wix server. You are going to place the codes on Wix server as well for the best performance. The instruction is below.
- Hit the “<“ button to display “Site Structure” window
- Expand the “Backend” and create a backend module
- Rename your backend module as “multi-page-form.jsw”
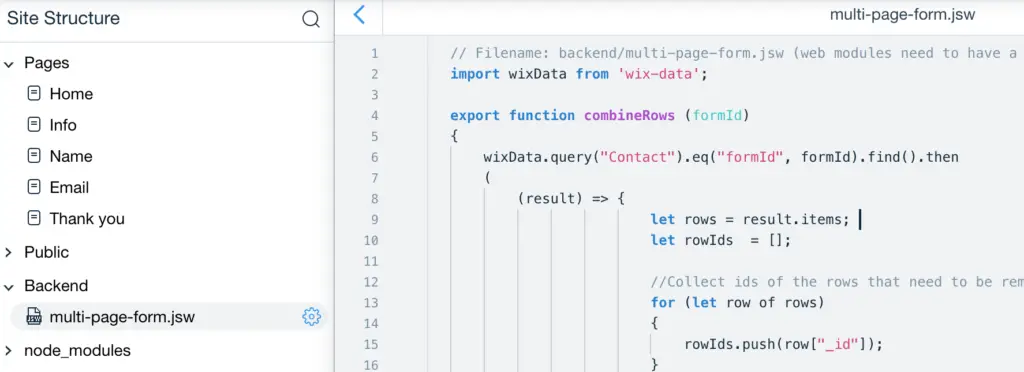
Now you copy the codes below to your backend module “muli-page-form.jsw”.
import wixData from 'wix-data';

export function combineRows (formId)
{
    wixData.query("Contact").eq("formId", formId).find().then
    (
        (result) => {
                        let rows = result.items;
                        let rowIds  = [];

                        //Collect ids of the rows that need to be removed from collection
                        for (let row of rows)
                        {
                            rowIds.push(row["_id"]);
                        }

                        //Go through each row, and add the row data to the first row
                        for (let index = rows.length - 1; index >= 1; index-- )
                        {
                            //Go through each field in each row, and add field value to the first row
                            for (let field in rows[index])
                            {
                                if (rows[index][field] !== null)
                                {
                                    //Assign field data on each page to the same field on the first page
                                    rows[0][field] = rows[index][field];
                                }
                            }
                        }

                        //Remove all the rows from collection
                        wixData.bulkRemove("Contact", rowIds)

                        //Insert the combined row (the first row) to collection
                        .then
                        (
                            (removeResult) => { wixData.insert("Contact", rows[0]); }
                        );
                    }
    );
}
Step 6: Call Wix Server to Do The Work
Just one more step. In this step, your Wix site calls Wix server to combine rows in the collection. You revisit the Site codes. You replace the codes there with the codes below.
import {session}     from 'wix-storage';
import {combineRows} from 'backend/multi-page-form';

$w.onReady(function () {

    let formId = session.getItem('formId');

    if (formId === null)
    {
        //Generate an unique id for the multi-page form
        formId = Math.random().toString();

        //Save the form id to browser session memory
        session.setItem('formId',formId);
    }

    //Assign formId in session memory to the form on page
    $w('#formIdInput').value = session.getItem('formId');

    combineRows(formId);
});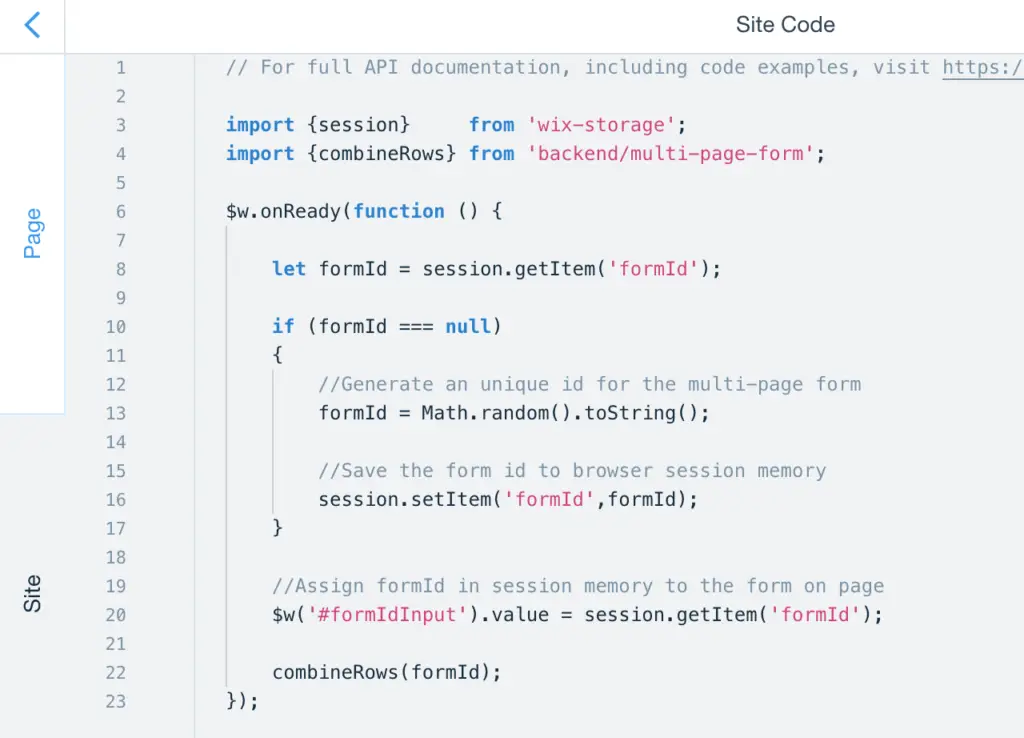
Now your site is capable of generating a formId per user and calling Wix server to combine rows.
Conclusion
The later steps are quite technical and hard to understand if your don’t have programming background. Thank you for sticking around until the end. Your multi page form should be functional. Give it a try. The result form my example is below.

Let me know in the comments below if you have any question.